


Clouds Therapy
Outline / Concept & Summary
As a child, one of my favorite activities was staring at the sky, imagining clouds as animals and watching them drift slowly across the sky. I have kept this habit till now. When I feel sad, I walk to my window and gaze at the clouds. It brings me inner peace and clears my mind.I've always wanted to walk into a cloud. I can’t do it in real life, but I certainly can in games. In this project, I choose one representative type for each hight layer.

Project Explanation:
Clouds Therapy
Modelling / Houdini simulation (Base)
Frame Work:
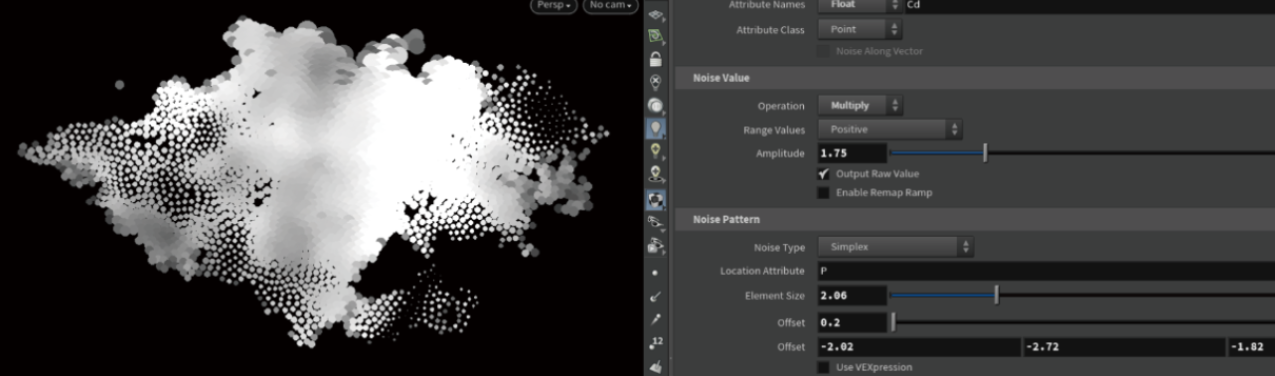
Big shape; Detail on each bund; Edge detail.


First, I have created a grid, and scattered particles on it to achieve a sufficient density for the effect. I use two different attribnoise nodes to introduce variations and add additional layers of detail.
Then, After removing any unnecessary particles, like cutting out a piece of paper, I applied two different noise nodes to add detailed variation on the base. The Pscale attribute controls the Density of the future fog, while Cd will be converted to Temperature.
Process Explanation:


Below is the attribvop outcome, in here, I further adjust the basic shape. This includes noise; length; width and size.


There are three main nodes here: aanoise; a vector3 and fit.
aanoize and vector3 have the biggest influence on the overall shape. Together they determine the size, roughness, noise type and noise offset. All three iterations below are achieved by adjusting these values.
The fit and length nodes calculate the distance from each particle to edge, make sure all the valuable ones are in the middle and marked white.


Clouds Therapy
Modelling / Houdini simulation
Project Explanation:

Step1: Set attribute “temperature” by a function based on Cd information previously created.
Step2: First thing In the dop network, import particles.
Step3: Field1 converts “temperature” from particles into a gas field (distance between each particle and edge).
Field3 does the same for "Density"
Step4: Use intermittentsolve to limit the simulation on the first frame, which will yield better results. Then, combine it with a smokeobject.
Step5: Use gasdisturb to generate the overall look, simulating large-scale airflow.
Step6: Use gasturbulence to add finer details along the edges. In this case, I use smaller values to create more frequent variations.
Step7: Connect all of them to a smokesolver for final adjustments.


Below are the steps of creating a cloud


Clouds Therapy
First, retrieve the world position and combine it with a Vector3 to use as the UV coordinates for this noise texture. This noise will continuously change over time due to the addition of a Time node.
Then, add two more similar processes with different noise patterns to break up repetition.
Interactive fog / Shader
Process Explination:
To build a realistic fog we need to add details to it's shape, just like we did in houdini.


Clouds Therapy
Interactive fog / Niagara
Project Explanation:
To create interactivity, Niagara particle system is needed. After adjusting particle size, emmision and direction, I set the real-time position of my character as an imput to an Attraction Force with a negative value. Now our character will push away these particles where ever he goes.


